Thursday, February 23, 2012

Travel Brochures for Los Angeles? Check Second Floor, Travel Services

Remember me telling you about our LA Fashion District expedition?  Here's a quick review of exactly what YOU could see if you decide to travel in that direction!  

Our driver and tour guides!


The very first thing I saw upon 
exiting the vehicle...


and it only got better...


thread...


and don't forget the zippers!


Do you see this sign?   A dollar a yard....


or $2.50 PER POUND!!!!


This is an entire front store window showing the different appliques they carry....


You can't see it BUT they had a NY applique like the ones on the baseball hats for the Yankees.  
I would become a Yankee fan just to have one of those appliques!  

We shopped until we dropped.... almost!   This little tour guide.....


insisted we make one more stop here...


for some of this!   


A great idea, don't you think?  

If you stop by Customer Service for some travel advise, 


LA Fashion District -- with a side trip to Pink's -- 
will be on our top ten list for sure!  The only suggestion would be to make sure 
you take enough time to explore the entire district!  We didn't even get into 
the clothes and the shoes and the purses.... 
the fresh flowers and the high tech "stuff".... 
oh, and did I mention the food trucks parked everywhere?

I could easily moonlight as your tour guide!


Tuesday, February 21, 2012

FAQ at Customer Service: Connection between Ziplock baggies and future projects?

GREAT question!   You will often hear me talking about grabbing another "ziplock project bag" after I've finished with something else.  What constitutes a "ziplock project bag" you ask?  Allow me to explain the method to my madness!  

I was constantly having to look through buckets trying to find the fabric that matched the pattern that matched the zipper that matched the thread that matched the trim...  Guess you get the idea!   So I jumped in with both feet -- brought every single bucket into the living room that contained anything ever purchased at JoAnn Fabrics, Hobby Lobby, Walmart or wherever.   Emptied them all and started to brain storm....  


There had to be a way of getting things in order so I could see what I had to work with.  

First came the initial screening process:  fabric I'd bought "just because I loved it" and fabric I bought "with a specific purpose in mind."   It was easy to organize that pile that had no specific project assigned to it.  Then came the stash that had fabric, buttons, zippers, and any other miscellaneous supplies with it.  How to keep all of that separate?   I'd already taken the time to amass the appropriate thread color, the designated number of buttons needed, and the proper length zipper -- not mention that 3 yards of eyelet lace that was called for during step #26 of the pattern!   It was all there -- but how to KEEP it all there and together -- and not break the bank?

IDEA!!!!


Each project was put into it's own gallon size ziplock bag -- along with any and all supplies needed to finish that project.  And then the ziplock bags were arranged neatly inside the plastic storage buckets.  A perfect solution to my problem -- one that has worked out great for me!  

I love organization -- but not as much as Fashion Coordinator Daughter does!  She was born with the specific "organizational" gene, which she must have inherited from my sister Amy.  Again I ask the question -- where was she when that bill for Daughter's braces was due?   Anyways...  With the new position we are taking at 


we will be moving into a one bedroom apartment at the property we are assigned to -- for the time being, until we work hard enough to get promoted.  (At which time we will get a two bedroom apartment -- to much information?)   I'm totally ready for that -- can fulfill my job requirements, clean the bathroom and have plenty of time for my sewing / craft projects.

The flip side is that I'll be living in a one bedroom apartment!  That's going to take some mad organizational skills.   Have been secretly spying out Daughter's "Organizational Fabulousness" board on Pinterest for some ideas.   Check these out...


Love this idea for towels -- or maybe a robe?  


Who wouldn't mind doing laundry in surroundings such as these?  


And here are a couple I've pinned in hopes of having a craft room all to myself some day...


This was made from a recycled oatmeal container -- how cute is that?  


So.. not much in the way of "finished" projects to share with you today.  But I did want to explain my made up term of "ziplock project bag" and share my idea for using this product to get my fabric / craft stash organized.  Use it if you think it will be a help...  We're happy to help here at the Customer Service Desk and ALWAYS look forward to any and all suggestions you might have!  


Saturday, February 18, 2012

Unsure of store hours? Allow me to explain....

Have you stopped by the store lately only to see the lights off and the place looking empty?  Well.... there's a perfectly good explanation for that!  The lights have been off and the place has been empty!  Not really!!  Allow me to give you a picture explanation of my life over the last month....

Grabbed a ziplock project bag from the stash and finished up / made these...


Worked mostly from memory on these, using techniques I'd seen before.  How's that for vague?   I did look around though, and found tutorials for two different zippered pouches (here and here) over at Skip To My Lou's blog.   I added an extra step at the end too -- boxing the corners so that the pouches would be able to stand up by themselves if needed.  Just think it gives the look that extra "I cared enough to do my very best" look.


Wished I had seen this one first though -- love it even more than the ones I made.  
That extra punch that the pleats give...  So cute!  

After I crossed another "finished" project off my list, but before I could grab another to do, I found myself in desperate need of  this:  


I swear, the older I get the easier I get sick!  
Think the guy over on the next block had a case of the sniffles and I caught it!   
Praise the Lord, was able to get that under control in time to head out on an unexpected vacation here..


We spent two days with Oldest Son and his family.   
Daughter-in-law's family lives in LA, and 
we were able to drive over to spend some time 
with everyone.  
Highlights included:  


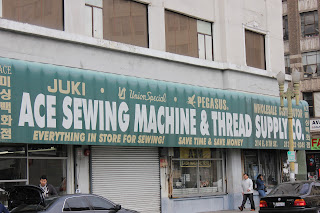
You gotta see this place!  
There was fabric and trim and thread everywhere!   It was amazing.   
A fabric hoarder's dream come true.  
After that, we were treated to lunch here:  


Totally on my bucket list!   
Guess what I had!  
Yep... a plain ole' hot dog with ketchup, mustard, 
chopped onions and relish --- onion rings on the side!  Worth every single calorie for sure!

Saw this from a distance


Which was also on my bucket list... 
Los Angeles -- what a place! 
And I'd do it again in a minute to spend just one second with these cuties....


In the midst of all of the above, Husband and I received job offer letters from this place!


We leave a week from Sunday for two weeks of training in Dallas.  We are very excited about this opportunity -- been a long time since I was active in the work force so will be a huge change for me.  Husband will slide right into his new responsibilities easily so am hoping to ride along on his coat tails!

Needless to say, that's why you've seen this whenever you've come to 33rd and Broadway recently! 


 We are heading into another crazy month, what with being gone 
to Dallas for two weeks, then having a week to move to our 
new location / job.  Wish us luck -- and I'll do my best to have 
SOMETHING fun and exciting 
on the shelves should you find time to stop by!  
If you want, I'll show you my menu from Pink's too!  


Tuesday, January 31, 2012

Holiday Fantasies Department -- Main Lobby. Special on Valentine's Day Garland.

I'm stealing this Pinterest idea from my younger sister Kelly's blog post (her blog is called Restitch Me) who, in turn, got the idea from  this blog.    And yes, this will qualify as my Pinterest project for this week even though it was not my original "pin"!  I was just reading a daily devotional entry about the verse in Ecclesiastes 1:9 that says "The thing that hath been, it is that which shall be; and that which is done is that which shall be done; and there is no new thing under the sun."   Guess that's the case here!

Please don't judge me for the pop tart package in the background!
Am taking this pile of hearts cut out from the latest Martha Stewart magazine


and have made it into one of these!


Very simple project for today, but that's okay!   Have just finished up two huge projects (huge in that they were a little bit out of my own comfort zone) and am happy to have something simple, silly and fun to think about doing!   I posted my "squatty tote bag" yesterday, and am guest posting over at Restitch Me with the big cushion project!   Check it out!  

This garland was to be sent to college to Youngest Son's girl -- in hopes of bringing a little bit of Valentine's cheer to her dorm room.   As of yesterday morning, the Valentine's Banquet being held at the college was a "no go" for Caleb and Brook  this year.   Both of them are working hard at their various jobs to keep that school bill paid up, and that doesn't always leave much money left over for date activities.   And that's totally okay!!!!!   God knows and sees exactly what they need and what lessons there are that need to be taught in any given situation.   I'm proud to say that they both have had very good attitudes when it became clear that the banquet would go on without their presence this year.

Fast forward to the afternoon hours just before work shifts were to begin.  Walking to the parking lot,  Caleb noticed an envelope tucked under the windshield wiper of his car.   Printed on the outside was this message -- "Here are two tickets for the Valentine's Banquet.  Take Brook and have a great time!"   Signed, A Friend.

Happy dance!   Shouting "glory" and jumping for joy!  When God blesses in such a fashion, how can we possibly doubt His love for us?  He not only cares about the things that we NEED, He is constantly watching to see where and when He can bless us with "the desires of our heart."    It reminds me of that song "I stand amazed."    Husband, Caleb, Brook and I all stand amazed!   But seriously, isn't that just like God....

A completed Valentine's Day garland?   Why, that's just icing on the cake!  

Monday, January 30, 2012

Check the Main Lobby, Bag 'n Baggage Department for Bible Tote Bags

My first order!   From my BFF Chrissy -- she needs a tote bag to carry her HUGE new Bible in!   I have one just like it so am able to give you a peak at it's size!   Price we both are paying for getting older!


Obviously the first step for me was to find a tote bag tutorial that I could fall in love with!   Done and done!  Check out this tutorial for a Squatty Tote Bag from The Crafty CPA.   I love the "squattiness" of the bag and thought it would work out perfect for this project!   Boy was I RIGHT!!!!   When you finish reading here, check out Megan's blog -- I'm having a blast looking at all the wonderful projects / ideas!   She's doing some awesome things with polymer clay!  

Back to the tote bag -- Fashion Coordinator Daughter and I picked these fabrics out of my stash -- the leopard print is every where these days so that was a must.   Wanted a cream fabric for the outside so we could embellish with paint but, at first glance didn't have anything that would fit the bill.   Brain storm!   Why not use the cream colored 1/2 yard of pinwale corduroy for it and just turn the fabric inside out?   Yippee!!!


Tutorial -- check!   Fabrics -- check!   Embellishment ideas?   Beth searched Pinterest for a "slogan" that would fit Chrissy perfectly!   No problem -- "embrace messy hair."   That was so easy as it has Chrissy's personality all over it!    Next step was to grab the Cricut machine and cut out the stencils.


Went to work with my bottle of black craft paint and my small stencil brush.


Be prepared to be very scared!   
This picture is NASTY but wanted to show you finished product.  Don't you just LOVE
 the beads that Daughter found in the stash to put on here and there?
She really is underpaid here at 33rd and Broadway! 


On to the sewing part!   Following the tutorial was a breeze!  I used her measurements exactly when cutting out the pieces.  Bought the hardware she suggested for the handles too.   I opted out of the piping this time -- would definitely suggest using it on another bag though.  Megan had instructions within her tutorial for making your own piping and they looked equally fantastic and easy to follow.  

I did deviate from the tutorial in a couple areas -- I put some pockets on the inside as I know Chrissy doesn't usually carry her purse with her to church and Bible Study.   I loosely followed the instructions from this tutorial found at Hooked on Needles blog.  I don't think I can explain my thought process clearly but will give it a shot.  Using the pattern for one of the lining "walls" I cut it down 4 inches SHORTER and made another two wall pieces.   Sewing those two pieces together at the top -- right sides together -- I turned it wrong sides together and pressed at the top.  This obviously was done to cover up the raw edges and to "line" the pockets themselves.  Pinned the pocket pieces to the wall piece along the bottom edges, and then decided where I wanted my pockets to go.  I choose two SLIM pockets in the middle for pens as I know Chrissy NEVER has a pen with her -- and then two larger outside pockets for her mints, keys and cell phone.


The other step that I added was putting purse magnets on either end of the tote bag up at the top.   The fabric wasn't all that stiff and I wanted to give a little bit of structure to the bag itself.   Hind sight, I would probably have used an iron-on interfacing -- medium to heavy -- to give it more stability, along with the magnets.


The rest of the bag construction was simple.  Here is a picture of the finished product.  
I just love it -- there's plenty of room for Chrissy's Bible to lay flat on the bottom, and the pockets will provide room for her mints, pens, keys and cell phone.    I know for a fact that this tutorial will be one I come back to time and time again!


Let me quickly say a couple things about Chrissy.  She has an amazing website here and her facebook page is here.   Both of these sites are devoted to an amazing book she has written 
"When I Fall Please Grab My Hand."  
It's a devotional book that is out of this world.  I have a autographed copy of it that sits right on my night stand next to my Bible.  I guarantee that the Lord will speak to you through the daily observations Chrissy makes while just living life.   It's down to earth and easy to read.  Knowing Chrissy for all these years, I can testify of her strong love for Jesus, and for people!   But don't take my word for it -- stroll through her website and facebook page and see for yourself!  

Okay!  Just phoned from the Customer Service Desk 
here to check on status.  The shipping room needs to put a mailing label on the "squatty Bible tote bag" box, then it's on it's way to sunny Florida!   Check it out -- who doesn't want to go to church in style!  


Friday, January 20, 2012

Attention boys and girls! Buzz & Woody pillows available! Young World Department on the 2nd floor!

Remember the Pinterest challenge I made for myself -- using one of my pinned ideas per week?  That's where we find ourselves today.  I want to try and make one of these 


Out of this fabric found at the SAS Fabric Super Store  


Commercial break here:  Fashion Consultant Daughter and I discovered this AMAZING place -- SAS Fabrics Super Store --  right here in Phoenix.   Fabric for our body pillow was purchased for around $7.00 for the piece you see here.  They had several other choices but Sawyer is definitely a Toy Story man!  When you visit SAS, be prepared to spend some time and you must be ready to DIG!  SAS Fabrics Super Store -- a must see if you are a seamstress and live in the Phoenix area!


We now return you to our regularly scheduled program!   

Remember this is me with the "no pattern" phobia!  Well, I'm fixin' to try and make this little project from the picture.  If you aren't as adventuresome as I am, check out Great Little Trading Company.  They offer "ready beds"  here on their website.   


The hoarder in me didn't want any unnecessary expenditures on this project.  That said, asked Fashion Coordinator Daughter to raid her bedding stash.  She was able to come up with 3 extra pillows.  I decided to run the pillows long ways instead of how they appear in the store bought version.  With that in mind, the fabric needed to be cut down into a narrower strip.  After measuring  a current pillow case I decided on the width measurement of 42 inches.   It took a little positioning to capture as much of the Woody and Buzz picture as possible.   After sewing the main long seam, here's what I ended up with -- a tube of fabric with a seam down the middle of the back.  


I then sewed across one end of the "tube" of fabric, closing it off.   


Pillow #1 was inserted at the top, followed by a row of stitching.  Pillow #2 inserted -- row of stitching.  Pillow #3 was last and then I closed up the end with... you guessed it -- a row of stitching!    VERY simple really -- and Sawyer and I loved the end result!  


All three pillows are completely enclosed.   The fabric and the pillows are all machine washable.   I suppose you could put zippers in each "compartment" though, allowing you to remove them as they needed washing.  Just a thought!  


My model was distracted here -- by Toy Story 3!  


Another satisfied customer!  

And if you've not had enough of my luscious grandkids... here's two more! 


Please stop by Customer Service and let me know if you see a Buzz Lightyear body pillow in your future!